UPGRADE THE SYSTEM DATABASES
You only need to upgrade the databases if you have installed a newer/different version of SG on the new server, than was running on the original server.

UPGRADING SYSTEM GALAXY DATABASES
ASSUMPTION ...
-
All GCS Services are stopped while trying to upgrade databases
-
Launch the System Galaxy Installer USB/ISO and select Step-2 Upgrade Database.
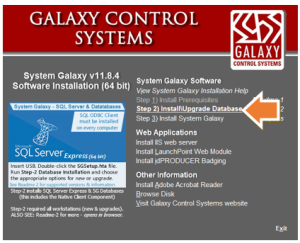
GCS Installer splash screen
-
Click Continue button on the MSSQL Precheck screen (not shown).
-
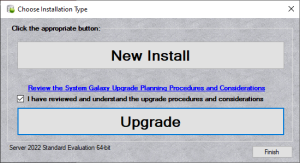
Click the UPGRADE button on the Install Type screen.
-
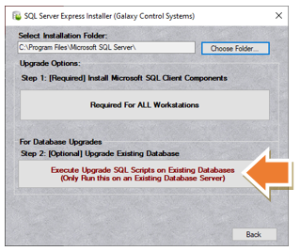
Select Step-2 Upgrade Existing Database option.
-
Select (highlight) your SQL Instance name. on the Upgrade screen (pictured below)
-
Enter the sa login credentials and click the [Connect to Server] button.
-
Click [Upgrade SysGalArc Now] button and allow the upgrade to complete. You must do SysGalArc first.
-
Click OK to close the Stop Services reminder message box.
-
Click OK to close the “Upgrade Successful” message when the upgrade is completed.
-
Save your results file on the desktop for easy retrieval.
-
Verify the SysGalArc Results File has no red error messages at the end of the file.

-
Click [Upgrade SysGal Now] button and allow the upgrade to process. You will get a “successful” message when it is finished. This process will take a few minutes.
-
Click OK to close the reminder message to stop Services.
-
You will get a “Please Wait while database is upgraded …” message.
Do not close this message.

-
Click OK to close the “Upgrade Successful” message when the upgrade is completed.
-
Save the Results file on the desktop for easy retrieval.
-
Scroll to the bottom of the text file to verify that there are no errors (red text).
-
-
Click All Finished button to close Galaxy installer window,
-
Click Exit on the System Galaxy Installer splash screen when finished.
|
IMPORTANT: If the Results file shows errors, you should redo the SysGal upgrade by clicking the Upgrade SysGal Now button again and allow the SysGal upgrade to run a second time. If there are no errors in the second results file, then you can proceed to the next section. If it still finishes with errors, save the results on the desktop and contact authorized tech support. |
RUNNING THE UPGRADE SCRIPTS MANUALLY
You must run the Upgrade scripts manually from MSSQL Management Studio in the event of errors ...
-
Launch the MSSQL Management Studio software from the Windows Start menu.
-
Connect to the System Galaxy database and log in.
-
Click File > Open and browse to the Scripts folder on your Galaxy install media
(in the installers folder). -
Select and open the Galaxy_Script_V2.0_B79_Extended_No_Customer.sql script in MSSQL Management Studio.
-
Make sure the SysGal database is selected in the SQL Manager droplist.
-
Click run the upgrade_SysGalArc script by selecting the SysGal_arc archive database.
(Be sure to review the results to ensure there were no errors.)
CONNECT AND UPGRADE THE IDPRODUCER DATABASE (MOVE & UPGRADE)
Skip this section if you are not upgrading. Proceed to Validating idProducer Existing Database Connection.
This section describes how to upgrade the idProducer database after you have moved it to the new server.
-
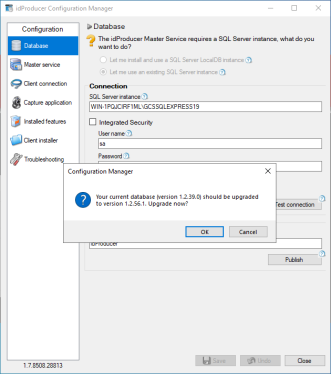
Open the idProducer Configuration Manager from the Windows Search bar.
-
The idProducer Configuration Manager should auto-detect the database version and prompt the user to upgrade the database.
-
Click OK on the message box to begin the database upgrade.
idProducer Configuration Manager: Database screen
NOTICE: If the install is interrupted by a ‘Visual C++ Redistributable Error’, you must install the correct Visual C++Redistributable files. Download the Visual C++ Redistributable v14.3X zip file from Galaxy Support page www.galaxysys.com/support . See Appendix: Installing C++Redistributable files for exact instructions.
-
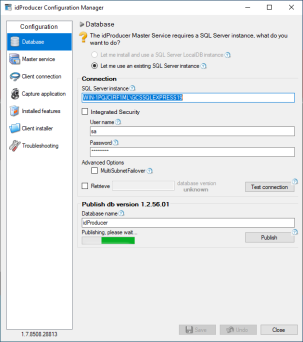
The Configuration Manager will indicate that the database is being upgraded and published at the bottom of the screen (green bar). Allow this operation to finish.
Configuration Manager: Database screen
-
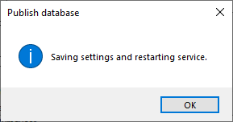
When the upgrade is finished, click OK to close the Successful Publish message.

-
Then click OK to Save Settings and Restart Services.
-
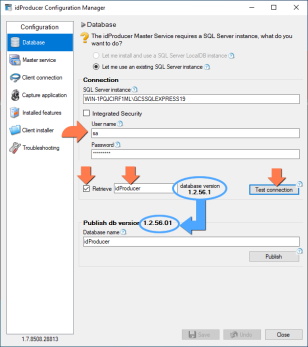
The Config Manager should show the new idProducer database version.
-
The Config Manager should show the default sa login.
-
Verify the Published and Retrieved database versions match by doing the following steps …
-
Select (“check”) the Retrieve checkbox option.
-
Enter the database name is “idProducer”. (i.e., must match the actual database name).
-
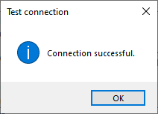
Click the Test Connection button to retrieve the database version number.
-
RESULTS: The retrieved version should match the published version (see the blue arrow) if you installed the same version of idProducer on the new server as was running on the original server.
idProducer Configuration Manager: Database screen
-
In the Troubleshooting screen, you can start the idProducer services.
-
Click Close when you are finished.
-
This completes upgrading the idProducer database on the new server. Proceed to the following sections to repoint your clients to the new server.
VALIDATE THE IDPRODUCER DATABASE CONNECTION (MOVE ONLY/NOT UPGRADING)
NOTE: If you are moving and upgrading the idProducer database, see the previous section.
This section describes how to connect to the restored idProducer database for systems that are only moving the database (i.e., not upgrading).
-
Open the Configuration Manager from the Windows Search bar.
-
Verify the Database Connection Settings are filled out properly …
-
The SQL Server Instance must be correct.
-
The Dealer SA login can be used.
-
-
Select (“check”) the Retrieve checkbox option.
-
Verify the database name is “idProducer”. (i.e., must match the actual database name).
-
Click the Test Connection button to retrieve the database version number.
RESULTS (non-upgrade): The retrieved version should match the published version (see the blue arrow) if you installed the same version of idProducer on the new server as was running on the original server.
idProducer Configuration Manager: Database screen
-
This completes connecting to the idProducer database on a non-upgraded server. Proceed to the following sections to re-register your clients to the new server