MOVING DATABASES TO THE NEW SERVER
This topic covers the process of migrating the databases to the new server, which includes recreating the client logins, running scripts, and editing app settings.

STOP DATABASE CONNECTIONS ON THE NEW SERVER
-
Ensure System Galaxy software, idProducer web client (browser) and Print Dispatcher are not running.
-
On the new server, you must stop the following services ...
-
GCS WebAPI service
-
GCS ClientGW service
-
GCS Comm service
-
GCS DataLoader service
-
GCS DBWriter service
-
GCS Event service
-
GCS (and any other GCS service)
Notate which other services you stopped.
-
idProducer Connector service
-
idProducer Server service
-
IIS Service
-
System Galaxy software application
-
-
Open the Services window by typing “Services” into the Search field of the Windows Taskbar.
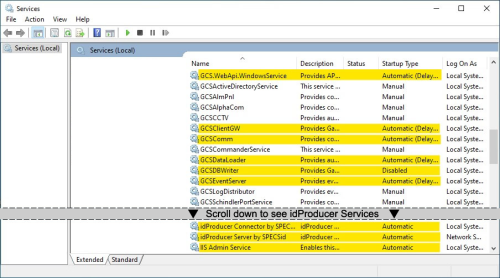
Services window showing all Galaxy services
-
Right-click the name of the service and choose ‘STOP’ from the shortcut menu.
-
Do this for every service listed above.
LAUNCH SQL SERVER MANAGEMENT STUDIO ON THE NEW SERVER
-
Move a copy of all the database .bak files into the SQL Server Backup folder on the new server.
PATH $:\Program Files\Microsoft SQL Server\MSSQL15.GCSSQLEXPRESS\MSSQL\Backup
-
Launch the SQL Server Management Studio and login to the System Galaxy SQL instance.
-
Select Database Engine for Server Type.
-
Select the correct Server Name
(machine_name\instance_name) -
Select SQL Server Authentication type.
-
Enter the “sa” login and password.
-
Click Connect to connect to the GCSSQLEXPRESS instance and its databases.
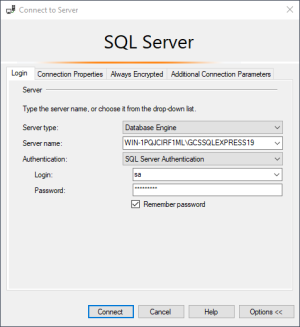
SQL Server Mgt Studio > Login window
-
DELETE THE BLANK DATABASES FROM THE GCS SQL INSTANCE
-
Under the GCSSQLEXPRESS instance, expand the Databases branch.
-
Delete the following databases from the database branch as follows…
-
SysGal,
-
SysGalArc
-
idProducer
-
Right-click each database name and select Delete from the shortcut menu.
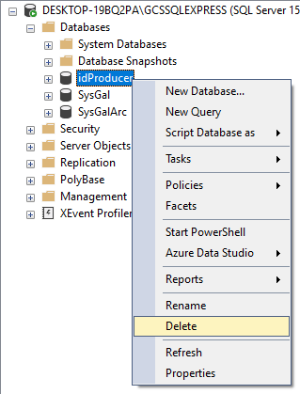
SQL Server Mgt Studio > Object Explorer
-
Click the OK button to confirm the deletion, as needed.
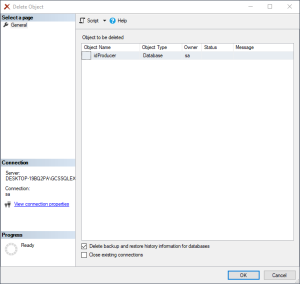
SQL Server Mgt Studio > Deleting Database Object
-
Repeat these steps for all 3 databases separately ( SysGal, SysGalArc and idProducer).
-
RESTORE BACKUP DATABASES ON THE GCS SQL INSTANCE
This section covers restoring the backup databases that you copied into the MSSQL Backup folder ( SysGal, SysGalArc and idProducer).
-
Right-click the Databases branch name and select “Restore Database…” from the menu option.
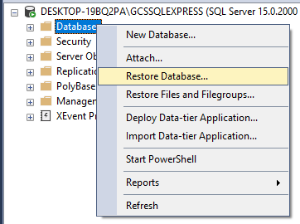
SQL Server Mgt Studio > Object Explorer
-
Select the General tab of the Restore Database screen …
-
Click the Device radio button in the Source section of the page.
-
Click the Browse [ … ] button to browse to the MSSQL Backup folder .
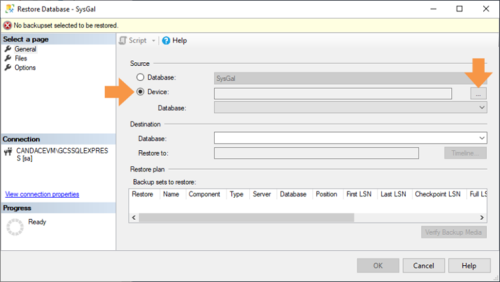
SQL Server Mgt Studio > Restore Database: General page
-
Click the Add button to open the Backup folder.
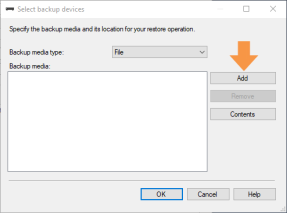
Restore Database General > Add Devices
-
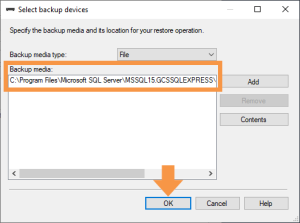
Select (highlight) one database filename that you want to restore (i.e., sysgal, sysgalarc, idproducer).
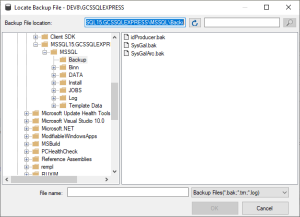
Restore Database General > Select Backup file
-
Click OK to select the bak file.
-
Click OK to add the Backup folder.
NOTE: the backup path (shown here) is the MSSQL15 backup path on the local server for
SQL Server v2019. Your backup path could vary but should display correctly in this screen.
Restore Database General > Add Backup Path
-
When you return to the General page, the fields should be populated as follows …
-
Under Source, the Device field should display the backup path to the database files.
-
Under Destination, the Database field should display the database name you chose.
-
-
Verify the Restore checkbox (is “check”) in the Backup Sets list-view.
-
Click the OK button to restore the selected database.
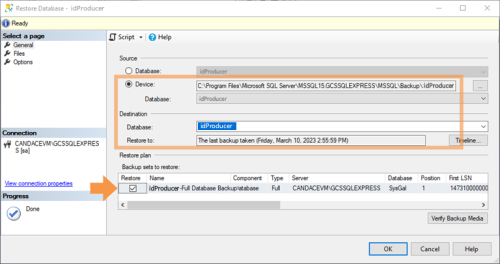
Restore Database > General page: showing the Full Database Backup is selected
-
Click the OK button to confirm the successful restoration.
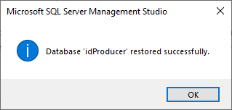
Restore Database Files > Confirmation message
-
Repeat these same steps to restore the other databases (sysgal, sysgalarc, idproducer).
-
Refresh the entire SQL Instance branch when you are finished restoring all the databases.
MANUALLY DELETE THE GCS USER LOGINS ON THE NEW SERVER
You must delete the Galaxy client logins for each database branch (i.e., sysgal and sysgalarc).
-
(SysGal) Delete the GCS User Logins for the SysGal database as follows …
-
Expand the SysGal database that is under the Databases branch.
-
Expand the Security>Users branches and delete GCS User Logins as follows:
-
Right-click the “gcs_client” and choose Delete from the shortcut menu.
-
Right-click the “gcs_web_client” and choose Delete from the shortcut menu.
-
-
(SysGalArc) Delete the GCS User Logins at the SysGalArc database as follows …
-
Expand the SysGalArc database that is under the Databases branch.
-
Expand the Security>Users branches and delete GCS User Logins as follows:
-
Right-click the “gcs_client” and choose Delete from the shortcut menu.
-
Right-click the “gcs_web_client” and choose Delete from the shortcut menu.
-
-
Refresh the Databases branch and verify both logins are removed from the databases.
-
(SysGal) Under SysGal’s Security>Users branch, verify both logins (gcs_client & gcs_web_client) are removed (not visible in the list of logins).
-
(SysGalArc) Under SysGalArc’s Security>Users branch, verify both logins (gcs_client & gcs_web_client) are removed (not visible in the list of logins).
-
MANUALLY RECREATE GCS USER LOGINS ON THE NEW SERVER
-
Recreate the gcs_client logins as follows …
-
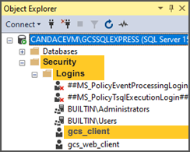
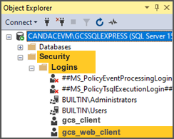
Expand the Security>Logins branch that is under the GCSSQLEXPRESS instance.
-
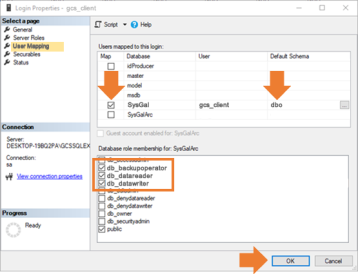
Double-click on the gcs_client login. This will open the Properties screen.
-
In the Properties screen, select the User Mapping screen
-
Choose (“check”) the SysGal database and enter “dbo” in the Default Schema field
-
Enable (check) the db_backupoperator, db_datareader, and db_datawriter and public.
-
Click OK to recreate the GCS User Login. The client login will be added to the chosen database.
-
Repeat Step-1 to recreate the gcs_client login for the SysGalArc database.
-
-
Recreate the gcs_web_client logins as follows …
-
Expand the Security>Logins branch that is under the GCSSQLEXPRESS instance.
-
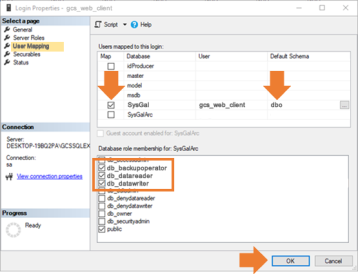
Double-click on the gcs_web_client login. This will open the Properties screen.
-
In the Properties screen, select the User Mapping screen
-
Choose (“check”) the SysGal database and enter “dbo” in the Default Schema field
-
Enable (check) the db_backupoperator, db_datareader, and db_datawriter and public
-
Click OK to recreate the login. The client login will be added to the chosen database.
-
Repeat Step-2 to create the “gcs_web_client” for the SysGalArc database.
-
-
Proceed to Running the License Script on the idProducer database.
RUN THE IDPRODUCER LICENSE (SQL STATEMENT)
This topic explains how to reset the idProducer license to “null”. This must be done so that the license can be recreated when the system is re-registered in a later step.
ASSUMPTION ...
-
You must have already successfully restored the backup file for the idProducer database.
-
Open the SQL Server Management Studio (SSMS) and sign-in using SQL Authentication and “sa” login.
-
Expand the “Databases” branch in the SSMS Object Tree.
-
Right-click on the “idProducer” database name and choose New Query… from the shortcut menu.
RESULT: a blank Query tab will open. -
Enter (or copy/paste) the SQL statement (below) and click Execute toolbar button.
sql must use exact syntax:
update idProducer.dbo.Subscription set License = null where SubscriptionID = 1000
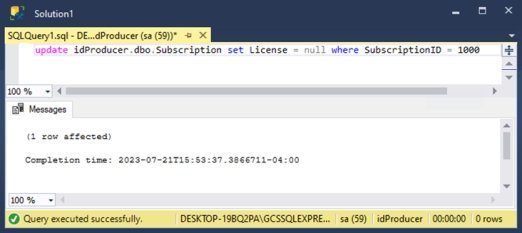
SQL Server Mgt Studio > SQL Query tab
-
To confirm your license is null, you can run the following SQL Statement on the idProducer database:
sql must use exact syntax:
select [SubscriptionID], [CompanyName], [License] FROM [idProducer].[dbo].[Subscription]
RESULT: the License column should be “null” for SubscriptionID 1000 -
Close the Query tab without saving. And the SSMS window.
-
Continue to the next section for Upgrading System Databases.