Part 4: View Video
This topic covers the general operation of the Video Viewer in live and recorded modes.
Features in this Topic
Playback Controls
The availability of playback controls and viewing modes may vary based on the type of camera connected or the permissions configured at the VMS Unit.
-
If a camera does not support a particular feature (e.g. ptz), then it will not be available in the Video Viewer.
-
The client login account at the VMS Unit must have the proper permissions to operate cameras and see video.
-
See the Manufacturer’s Documentation for instructions on programming the VMS Unit.
Operate Viewer in Live Mode
LIVE MODE = Select Live tab
-
Live Video Frame displays when operator chooses View Video from an alarm event or hardware icon.
-
Double-click a camera to start playing live video from the camera; (a checkmark appears beside camera).
-
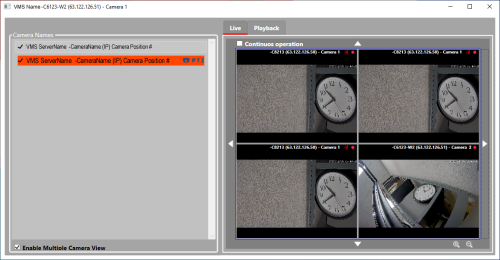
Grid View checkbox - toggles the video frame between normal view and grid view.
-
CHECKED = Changes the video frame to a 2x2 grid and enables viewing of multiple cameras
(up to 4 cameras at once). Double-clicking a camera starts its video in the next frame. -
UNCHECK = Returns video frame to single camera view. Streams live video of selected camera.
-
-
PTZ Controls - drive the PTZ camera in a desired direction (pan/tilt = 34 56) (zoom = +/-)
-
Continuous Operation checkbox – toggles the PTZ Mode between continuous sweep and incremental steps.
-
CHECKED = Continuous Sweep. PTZ Camera will sweep in the direction you drive it.
(click 34 56)Camera pans to the end of its range with one click. -
UNCHECK = Incremental Steps. PTZ Camera moves small steps in the direction you drive it.
(click 34 56) Camera pans step-by-step with each click.
-
Video Viewer – Live Mode
Operate Viewer in Recorded Mode
RECORDED MODE = Select Playback tab
-
Playback Video Frame displays when operator chooses View Video from a historical event in DVR View screen. The DVR View screen opens from the Activity History Report window if ‘DVR View’ is checked when you generate report.
-
Double-click a camera to choose it (a checkmark should appear beside the camera). You need to enter a date/time to start playing video from that point.
-
Date/Time field Choose a date and time to start the video. This will be the start time of the video you play back.
-
Playback Controls – lets operator control direction and speed of the video.
-
Play = starts playing video at the indicated speed.
-
Pause = stops/freezes video playback
-
Skip Forward/Reverse = skips forward/reverse in the direction you choose and plays video from that point.
-
Speed = sets the playback speed at 1, 2, 3, to 4 times normal rate of playback. “1” is the normal playback speed.
-
-
Playback Timer – show/hide playback clock. This clock starts from date/time selected (helpful if VMS or camera clock times are not synced or not displayed (configurable at the VMS unit).
-
CHECKED = shows the playback clock timer.
-
UNCHECKED = hides the playback clock timer.
-
Video Viewer – Recorded Mode
