Getting Started with LaunchPoint
LaunchPoint is a web-based Access Control & Security Management Software that offers access monitoring, cardholder enrollment, and management of user privileges - through user-fiendly Editors, Viewers, and Reports.
Features Supported
The main operational features allow a user to perform a variety of tasks such as search, program or edit, monitor, view, and report - as well as control hardware, send user commands, manage crisis mode, and more.
There are also administrative features that support admin-level tasks like create Dual-Authentication Logins, manage user permissions, create VMS Camera Groups and Elevator Floor Groups, and change the LaunchPoint window appearance.
-
Edit Cardholders - including add Photos, assign Access Permissions, assign, preview and print badges.
-
Configure Access - Access Groups (permissions), Time Schedules, and Special Days.
-
Control Hardware (doors & elevator floors) - includes viewing/exporting Activity History Reports.
-
Manage Crisis Mode - for all or selected hardware.
-
Monitor and manage Live Events & Alarm Events - for all or hardware (selectable).
-
Send User Commands in various situations.
-
View/print/export Reports - Activity History and Who's In Reports
-
Administer User Permissions - including Dual-Authentication login.
-
Administer Camera Group mapping
-
Administer Elevator Floor Group mapping
-
Administer Scheduled Reports
-
Administer App Settings - including dashboard appearance
FEATURES
The LaunchPoint Cloud App supports these major features and functionality.
The following screens are related to editing cardholders ...
Search Panel / Cardholder List
Cardholder Editor
The Cardholder List / Cardholder Search Panel allows the user to search for a cardholder based on selected criteria and see the results of the search displayed in the Cardholder List.
- Search for Cardholders by specified criteria such as name, department, etc. (search criteria list is configurable)
- Use the A - Z Index to jump to the section of cardholder population appearing at that position on the Cardholder List.
- View the Cardholder List of enrolled population that meets the search criteria.
- Open the Cardholder Editor for an individual cardholder record
- Launch the Add Cardholder Wizard if you determine your cardholder has not been enrolled.
- Synchronize badge templates (updates the badge droplist)
.png)
Cardholder List / Search Panel
(hover/tap to open/close thumbnail)
.png)
Cardholder List
See Features | See Search Panel Topic | Go to Cardholder Editor
The Cardholder Editor allows the user to change information for an existing cardholder record.
The editor includes the following ...
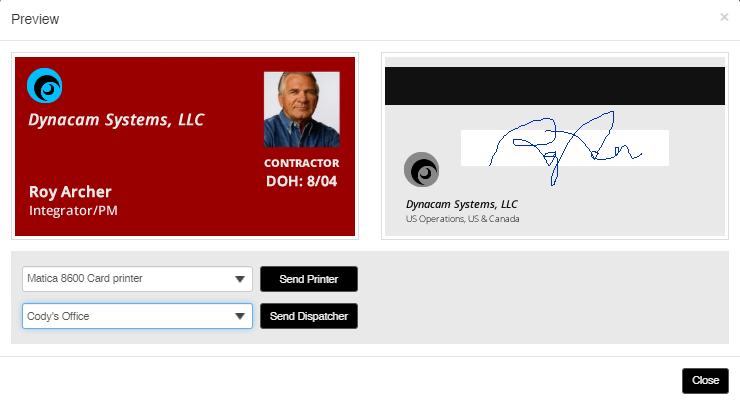
- previewing or printing ID Badges; assigning badge templates
- modifying, deleting or adding more access cards,
- updating access permissions and locations
- updating any discretionary information, such as photographs, personnel information, card expiration,
- synchronizing badge templates (updates the badge droplist)
- completing any information that was not done in the wizard screens
- disabling a card or cardholder without deleting the record (to preserve current history reporting)
.png)
Cardholder List / Search
(hover/tap to open/close thumbnail)
.png)
Cardholder Editor
(hover/tap to open/close thumbnail)
See Features | Search Panel | Cardholder Editor
The Door Control features allows the system user to issue commands to the doors.
-
Unlock doors
-
Lock doors
-
Pulse doors (momentary unlock)
-
Relay-2 Off
-
Also configure the unlock and reclose times for the door hardware

The Floor Control features allows the system user to issue commands to the elevator floors (relays).
-
Pulse Floor (momentary pulse)
-
Early On / Early Off
-
Cancel Early On / Cancel Early Off
-
View Video
-
Refresh Elevator Status

Elevator Floor Screen
(hover/tap to open/close thumbnail)
Elevator Screen
(hover/tap to open/close thumbnail)
See Features | Go to Elevators
The Badge feature supports the following things ...
- synchronizing badge templates (updates the badge template droplists)
- previewing badges (Cardholder Editor)
- printing badges (Cardholder Editor)
- removing or changing badges (Cardholder Editor)
LaunchPoint allows you to manage Access Privileges at the individual cardholder or on the global system level.
- Change access permissions for one person to be different from other people in the same group:
You can add a second (additional) access group to the person while keeping the existing group assigned. Or you can remove the existing access group and add a different access group to the card. In this way, only the individual cardholder is affected. A third possible option is to issue a separate card with the additional access group. LaunchPoint can support multiple access groups on one card or support multiple cards on the same cardholder with different cardholder access. - Change which doors are authorized vs. unauthorized to an access group:
You can add or remove the doors in an access group. This will impact all cardholders that are assigned to the modified access group. Other access groups are not affected. - Change which schedules are assigned to an access group:
You can change which schedule is assigned to the door(s) in an access group. You can change the schedule of an individual door, or multiple doors, or all doors. This will impact every cardholder that has the assigned access group . Other access groups and cardholders are not affected. - Change the time and/or day that cardholders have access to a specific door:
You can edit the time schedule; assuming you have only used this schedule on the door in question. - Be sure you understand where schedules are applied. If you change a schedule that is used/applied to multiple access group which doors “are in the same group” or “in other access groups are using the schedule you intend to change. Remember you can always make a new custom schedule and swap it out on the doors you need to change. Updates to a time schedule will affect any door in every access group that is linked to it. If you are sure you want to change all the doors, then change the schedule. If you have some doors that still need the schedule to remain as-is, then make a new schedule and assign it only to the doors you need.
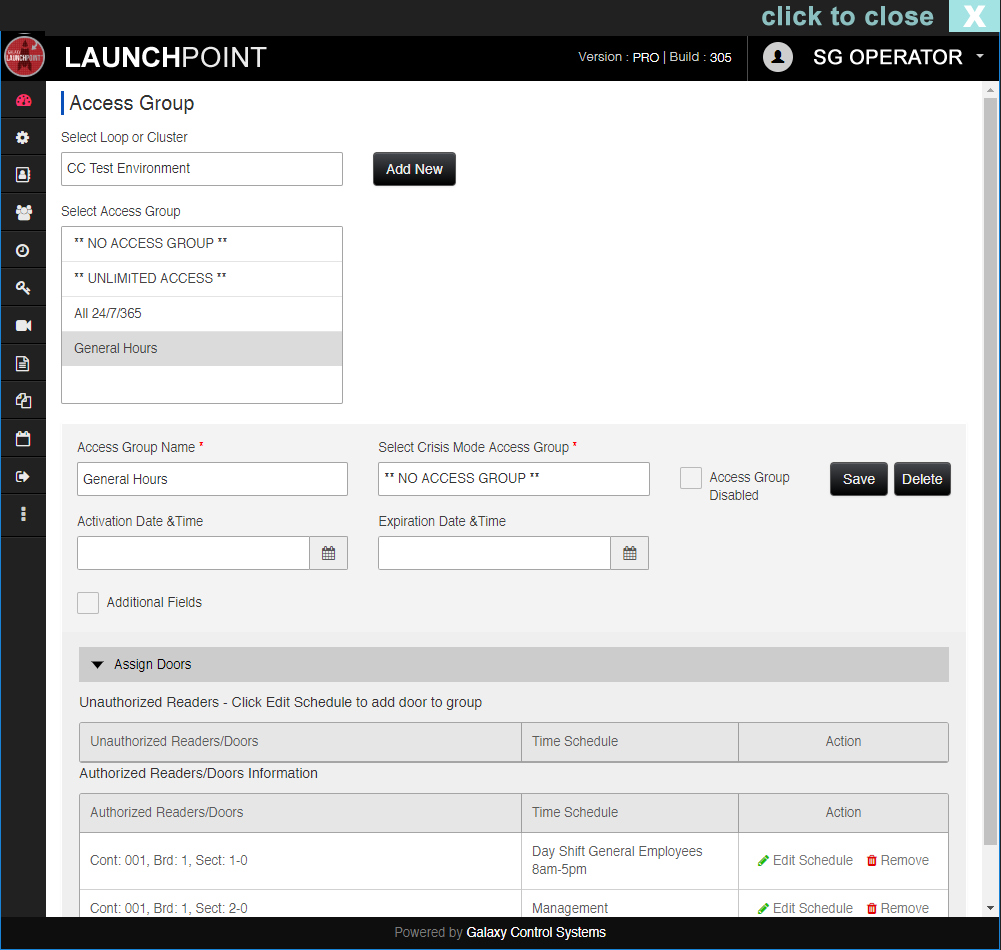
The Access Group feature supports the following ...
- assigning doors and time schedules to each access group
- assigning a crisis mode schedule to each access group
- assigning activation and deactivation dates to an access group
- disabling an access group
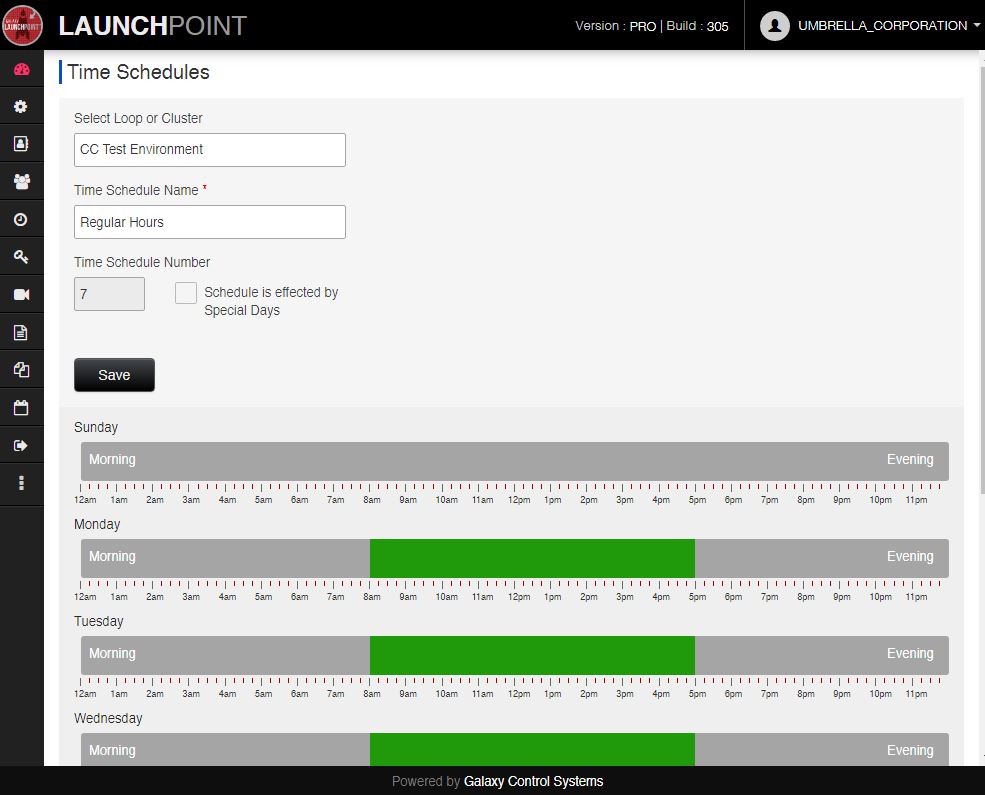
The Time Schedule feature supports the following ...
- creating custom time schedules
- assigning holidays or special days
The Reporting features support the following ...
- Cardholder List (Scheduler)
- Who's In (real-time snapshot)
- Reader Activity Report (configurable)
See Features
The LaunchPoint user interface (UI) is designed with user-intuitive, task-oriented design, which helps the user perform the task.
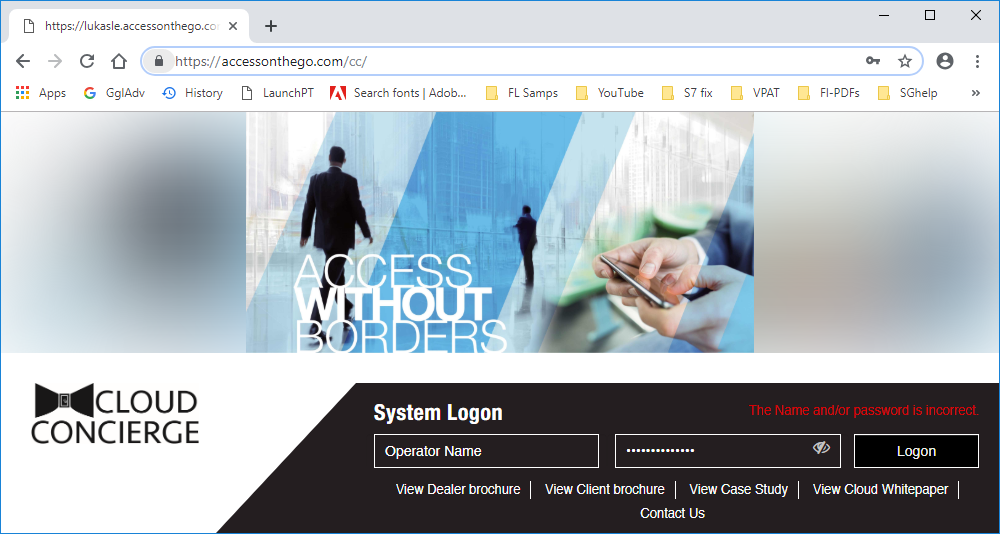
When the LaunchPoint web app opens in a browser window, the user can sign-in with a valid user login. The user login consists of a login name and password.
- Enter the Log-in Name.
- Enter the Password (case sensitive).
- Click the sign-in button and the Dashboard should appear.
If the user is inactive too long, the session will expire and the user must sign-in again to resume working.
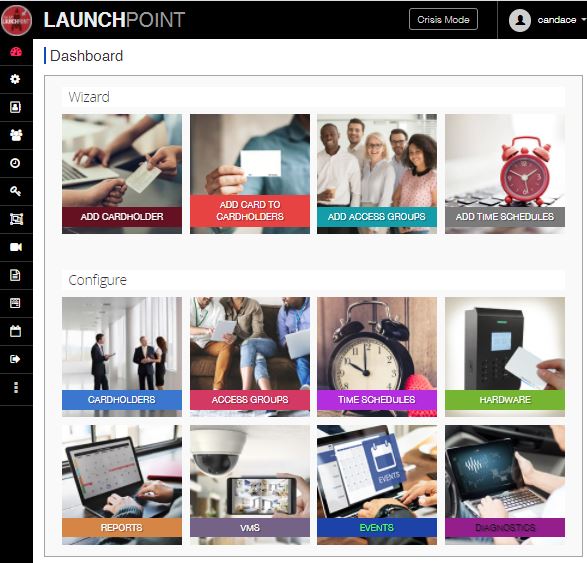
When the user signs in, LaunchPoint automatically opens the Dashboard
- the Wizard Tiles (clicking these will open the appropriate Wizard)
- the Configure Tiles (clicking these will open the appropriate Editor screen)
The user can control (show/hide) which Tiles are visible.
The user can always get back to the Dashboard by clicking the Dashboard Icon on the side menu.
.jpg)
The main sections of the LaunchPoint UI are as follows ...
- the web page Header - shows the logo and user name who is signed-in.
- the side Menu - includes a expand/collapse button to show and hide Menu Titles.
- the Quick-Launch Dashboard - includes a tile/icon for each feature (wizard or editor).
- the Editors and Wizards - UI screens where information is entered into the system.
- the Cardholder List - shows the list-view of filtered cardholder records, based on search criteria.
- Search Panel - provides search criteria fields to retrieve cardholder records.
- the Report or Event Grids - provides date-range fields for querying events.
- the Photo Verification window - provides a window to view cardholder photo
- the VMS Viewer - provides portal to the VMS API Plugin to launch the VMS viewer.
- the Door Control screen - provides option to lock and unlock doors.
.png)
The Sidebar Menu and Dashboard Tiles are the main method of navigating in LaunchPoint.
-
SIDEBAR MENU - When the user signs in to LaunchPoint, the Sidebar Menu is displayed along the left margin of the window.
If user expands the menu width, the Menu Names are visible. If the user collapses the sidebar menu, only the menu icons are visible. -
DASHBOARD TILES - The tiles for each function are displayed on the Dashboard provided the administrator has not hidden them.
Hover over a tile to see its sub-menu. Click to choose which screen to open.
When the user can open an Editor by clicking the related Tile on the Dashboard or Side Menu.
- The Editors are task-oriented. Data fields are arranged in a logical top-down workflow - with related fields and dependent fields grouped together.
- Required fields are outline in red and have a red asterisk beside them. These cannot be blank or unset.
- Optional fields can be configured at the user discretion but the workplace policy may mandate optional fields be set.
- Disabled/hidden fields are locked/grayed or not visible until the user has first chosen a dependent option or satisfied a condition. For example the access permissions cannot be assigned until a loop/cluster is chosen.
You can open an Editor screens from the sidebar menu or from the appropriate dashboard tile.
The user can launch the Wizards by clicking the related Tile on the Dashboard.
Also a wizard can be launched by clicking the appropriate button in the screens.
- for example, in the Cardholder Editor, you can launch the Card Wizard by clicking the [Add Card] button.
- likewise, in the Cardholder Editor, you can launch the Cardholder Wizard by clicking the [Add New Cardholder] button.
How Wizard screens operate...
- The Wizard steps the user through the screens in the proper order to complete the task.
- Wizards will not advance or save the record until the required or mandatory fields are satisfied
- User can skip optional / discretionary fields.
- User can navigate back and forth between screens.
- When the user saves the record, the Wizard may prompt the user to add another record.
- After the record is saved, the record can be viewed or changed in the editor screens.
LaunchPoint screens group related fields and related buttons together.
Typical UI controls let the user navigate and manipulate the fields.
- Tabs offer a stacked way to visit or cycle through groups of fields without leaving the main screen. Clicking a tab will show the related fields and had all other tabs.
- According controls will show/hide or expand/collapse a section of the screen where related fields are grouped.
- Some editors have push buttons that open sub-screens where more options are found.
- Some UI functions use a set of fields to let the user to define the starting and ending date or time. This is found in the Schedules screen and any Screen where reports can be queried by start and stop dates.
- Sub-screens, Models and messages pop open when a choice is made or button is pushed or trigger happens. User must close them to proceed.
LaunchPoint screens use colors, symbols and text to communicate errors or confirmations.
- CONFIRMATION DIALOGS - prompt user to make a decision - such as to save or cancel.
- ERROR DIALOGS - communicate a text message letting user know an action failed, is missing data, or has not met requirements. This often works in tandem with highlighted fields.
- INFORMATIONAL DIALOGS - communicate a text message to let user know a fact or tip or notice that is related to the function being used.
- HIGHLIGHTED FIELDS - typically red and bold outline is used to let the user know the field needs data.
- RED ASTERISK SYMBOL (*) - the red asterisk is used to indicate that a field is mandatory or required. The app will not save the record or perform the action until the data is satisfied.
- ON-SCREEN CAPTIONS - these text messages are static text that are always on the screen to instruct user how to use a field.
- FIELD LABELS - there is a text label for every field and option on the screen that intuitively describes the purpose of the field.
- LOCKING AND UNLOCKING FIELDS - some fields are locked until the user satisfies a piece of data or has saved a record. For example you cannot print a badge until you have assigned it and saved it to the cardholder. Some fields don't even appear until something has been selected or configured.
.png)
User Confirmation Needed
(hover/tap to open/close thumbnail)
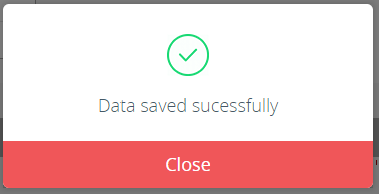
User Action Successful
(hover/tap to open/close thumbnail)
![]()
Required Field is Empty
(hover/tap to open/close thumbnail)
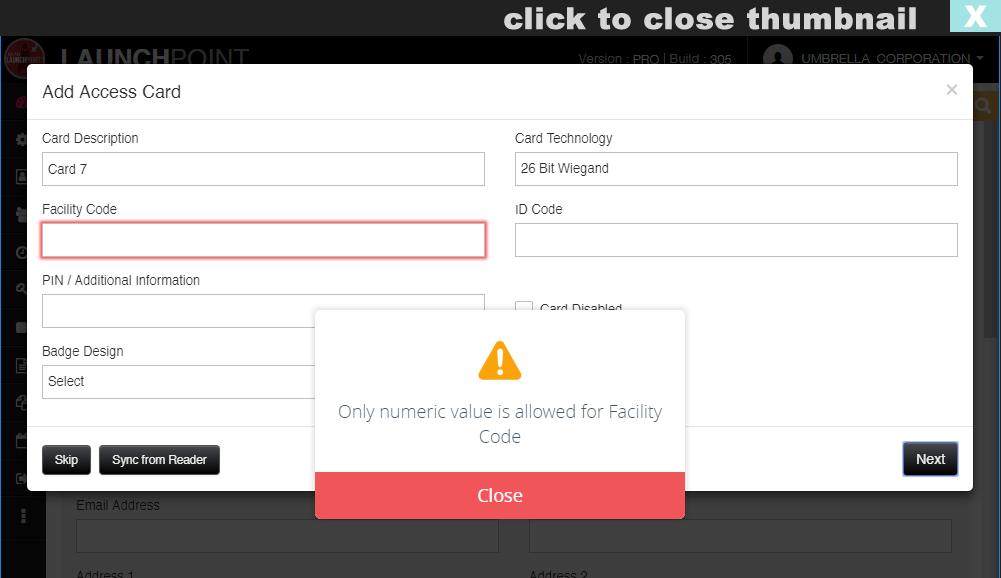
Required Field is Wrong Value
(hover/tap to open/close thumbnail)
See HOME